Creating an invoice — where and how
Invoices are created from five different surfaces in Suprata, and which one you use determines what gets pre-populated, what's already linked, and how much typing you avoid.
Four of those paths produce an invoice as a consequence of something else — work done, a quote approved, a cycle turning over, a booking made. That's how invoices usually come about in a service business. The fifth is the New Invoice button on a customer's Account, which gives you a blank invoice attached to nothing but the customer. It's the right tool less often than you'd think, and this article covers when it is.
The five creation paths
| Source | When invoice is created | What's pre-populated | Best for |
|---|---|---|---|
| Job → Complete | Auto, when a job's status flips to Complete | Customer, line items from job (parts/labor/time), tax categories, terms | Service-business work, the most common path |
| Estimate → Convert | When you click "Convert to Invoice" on an approved estimate | Customer, line items, terms, links to original estimate | Quoted work that the customer approved |
| Recurring Invoice schedule | Automatically, on the cycle you set | Customer, line items from the recurring template, dates | Subscriptions, monthly billing, retainers |
| Reservation / agreement | Auto, when a booking or contract generates a charge | Customer, charges, link back to the booking or agreement | Marinas, campgrounds, maintenance contracts |
| New Invoice on an Account | Immediately, when you click the button | Customer and their default terms — nothing else | One-off bills with no job behind them |
Path 1: Job → Complete (the most common)
The default and intended flow. A tech (or anyone) marks a job complete and the system automatically produces a draft invoice for that job. Line items come from anything added to the job during work — parts pulled from inventory, time logged, services rendered.
When it fires
- A job's status moves to Complete.
- The customer's tax category is applied to each line item via the price list.
- The terms default for the customer's Account are set on the new invoice.
- A draft invoice is generated and linked back to the job, so you can jump between them.
What you do next
- Open the resulting invoice (find it in the customer's Account → Invoices tab, or via the Open Invoices report).
- Review the line items. Did the tech add everything? Are quantities right?
- Adjust the theme, terms, or tax categories if needed.
- Send Invoice (see Sending an invoice to a customer).
When this path is the right pick
For 80%+ of service-business invoicing. If a tech did work, you bill for it through this path.
Path 2: Estimate → Convert
When you've sent a customer an estimate (a quote awaiting approval) and they approve it, you convert it into an invoice rather than re-typing the line items.
When it fires
- You click Convert to Invoice on an approved estimate.
- The system creates a fresh invoice with the same line items and the same totals, but as a real invoice rather than an estimate.
- The original estimate is marked Converted (locked from edit but kept as historical record).
What you do next
- Review the converted invoice — same line items, but the terms might switch (e.g., "30-Day Estimate" → "Net 15").
- Adjust the due date if the work-completion date differs from the estimate date.
- Send Invoice to the customer.
When this path is the right pick
When the customer formally approved a price before the work — and now the work's done and you need to bill. Most common in:
- Bid jobs (commercial customers who require a written approval).
- Larger residential repairs ("we have to order parts").
- Service agreements being formally accepted.
See Estimates vs. invoices — when to use which for the upstream side of this flow.
Path 3: Recurring Invoice schedule (auto)
For ongoing customer relationships — monthly retainers, quarterly maintenance, subscription-style billing — you set up a recurring invoice template once and the system creates a fresh invoice on every cycle.
When it fires
- Each night, Suprata checks every active recurring schedule.
- For each schedule that's due, a fresh invoice is created from the template you set up.
- The template defines the line items, terms, and theme; new dates and totals fill in for that cycle.
- If autopay is enabled and the customer has a saved payment method, the invoice is also charged automatically.
What you do next
The whole point of this path is "nothing" — once it's set up, the cycle runs on its own. Your job is monitoring:
- Failed autopay attempts (notify customer to update card).
- Customers who unsubscribe (stop the recurring schedule).
- Schedule changes (price increases, scope changes).
When this path is the right pick
- Software subscriptions, gym memberships, club dues.
- Monthly retainers (consulting, IT support, property management).
- Maintenance contracts where the bill recurs but the visits are scheduled separately.
- Reservations long-stay folios that bill monthly.
See Recurring invoices and Subscriptions vs. agreements vs. recurring invoices for the deeper differences.
Path 4: Reservations and agreements (auto)
If you run bookings or service contracts, those generate invoices too — a reservation's charges, a deposit, a settlement, an agreement's scheduled billing. You don't create these; the booking or contract does, and the resulting invoice carries a link back to it.
You review and send them the same way as job invoices. See Handling deposits and Creating a service agreement for the upstream side.
Path 5: Standalone — the New Invoice button on an Account
Open a customer's Account and you'll see New Invoice in the action bar at the top, next to New Job. Click it and you land immediately on a fresh, empty invoice for that customer. There's no job, no agreement, no reservation behind it — just the customer, their default payment terms, and an empty line-item list waiting for you.
It's available to anyone with the Edit Invoices permission, and it's the fastest way to bill for something that didn't come out of your normal workflow.
When this path is the right pick
- A charge with genuinely no work behind it: a returned-check fee, a restocking charge, a manual finance charge.
- Billing for something bought over the counter that never became a job.
- Correcting a billing situation where creating a fake job would be more confusing than helpful.
- Anything where you'd otherwise be tempted to invent a job type just to get an invoice out of it.
What you give up
A standalone invoice has no link back to anything. Six months from now, when someone opens it and asks "what was this for?", the only answer is whatever you typed in the line-item descriptions and notes. Invoices created from jobs, estimates, agreements, and reservations all carry a clickable link to their source; this one doesn't.
So: write real descriptions. "Restocking fee — 3 unused fittings returned 4/12, PO 88214" beats "Fee." The line items are the audit trail on a standalone invoice.
When to use a billing-only job instead
If the charge is something a customer might question, or something your team will need context on later, the older pattern is still better:
- Create a new Job for the customer, with a job type like "Billing Adjustment" or "Deposit Charge".
- Add line items directly on the job (no time, no parts — just a charge).
- Mark the job Complete.
- The auto-created invoice has just those line items — and a link back to the job.
You end up with a record in job history explaining why the charge exists, plus notes, attachments, and an activity log on the job. For a $12 fee that's overkill. For a $1,400 damage charge on a rental, it isn't.
Rule of thumb: if the charge might get disputed, use a job. If it's routine and self-explanatory, use New Invoice.
Also useful: cloning an existing invoice
If a customer regularly gets the same bill (and a recurring invoice schedule isn't right because the cadence is irregular), use the Recur Invoice option in the Invoice Actions menu of an existing invoice.
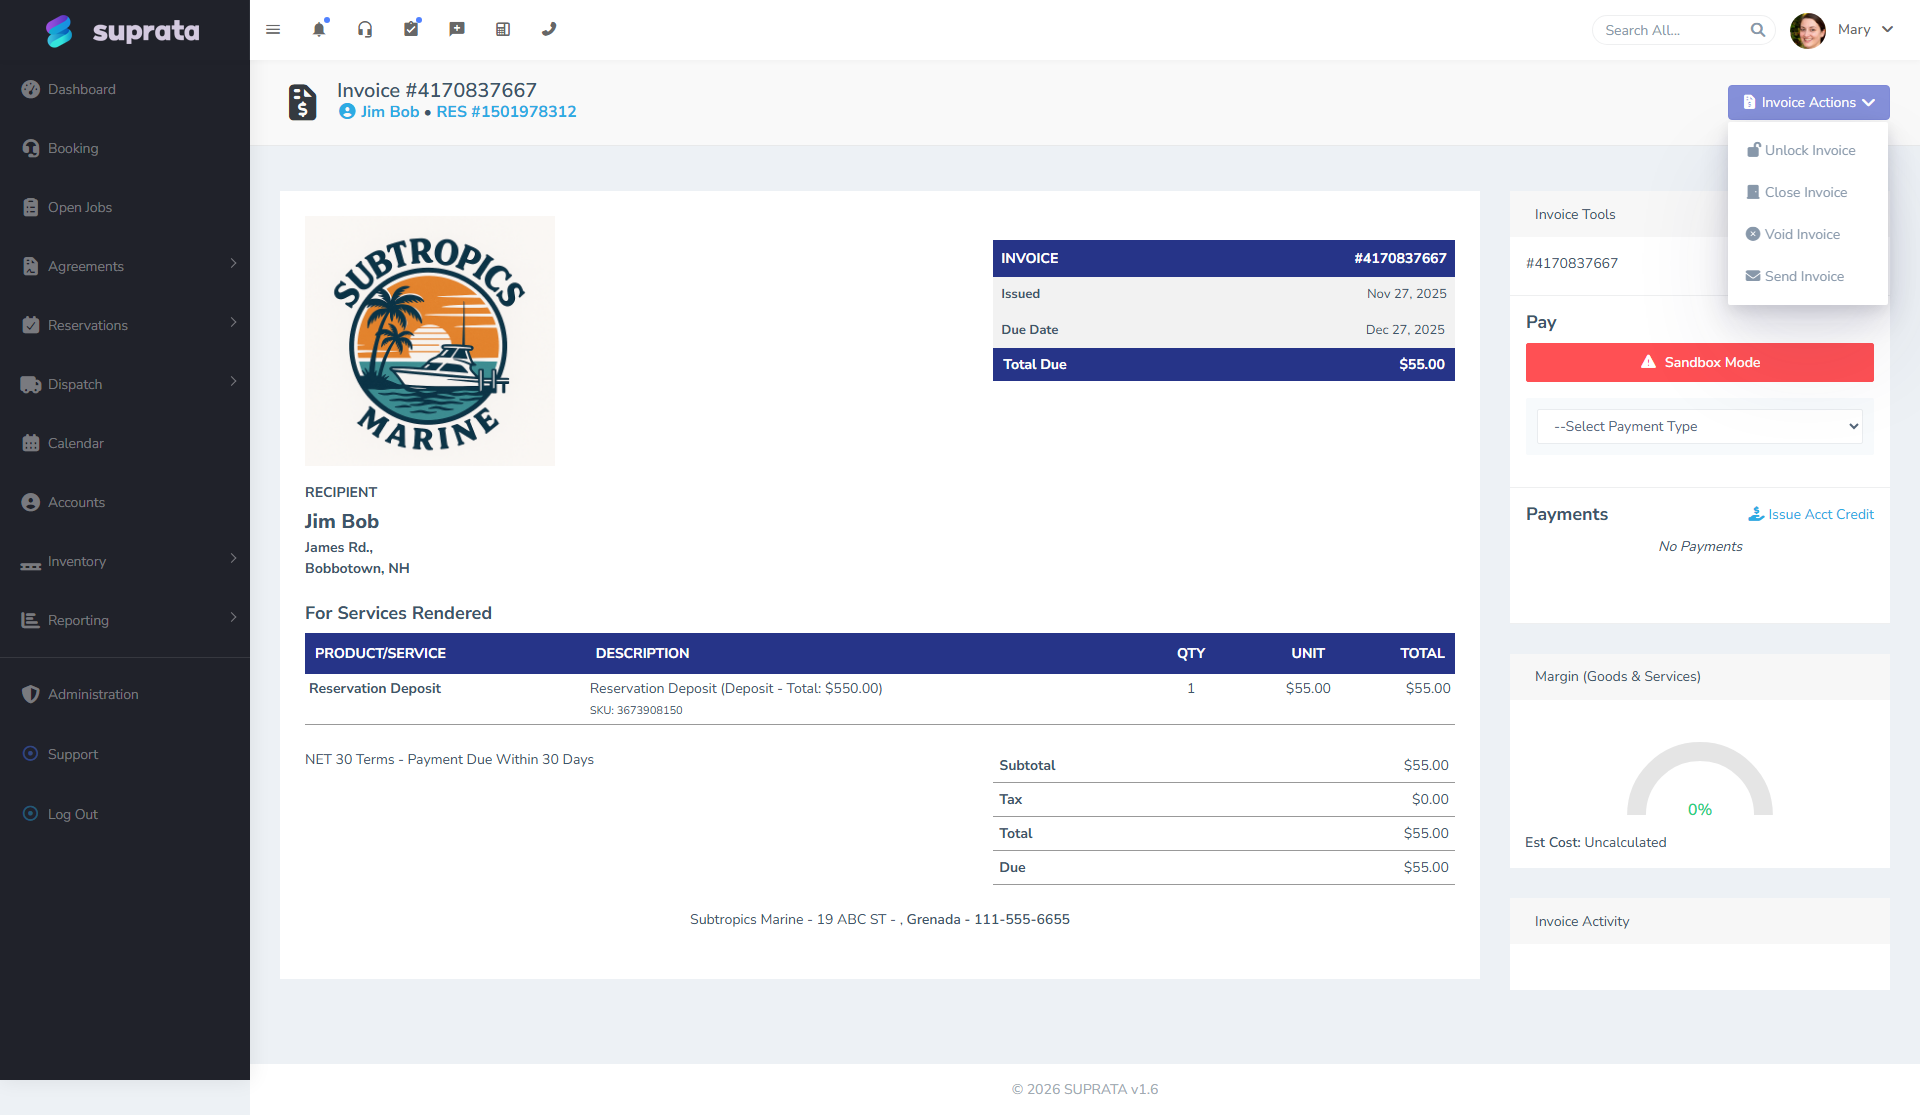
This converts the existing invoice into a recurring template. From there, the system spins up copies on the schedule you choose. If you don't want it to recur, you can also use it as a one-time "cloned" invoice.
How invoices are linked back
Every auto-created invoice keeps a link back to whatever originated it — a job, an agreement, a subscription, or a reservation. Open the invoice and you'll see that link in the header (e.g., "RES #1501978312" or "Job #2777283350"), and clicking it jumps you to the source. Converted estimates work the same way: the original estimate stays in your records, marked Converted, with a link to the invoice it became.
So if you ever wonder "why does this invoice exist?" — you can usually click back to the work, contract, or booking that generated it.
The exception is a standalone invoice made with New Invoice. Its header shows the invoice number and the customer, and nothing else, because there's nothing else to show. That's the trade you're making for the speed — see "What you give up" above.
What an invoice looks like once created
Here's a real invoice on a customer's account — the result of any of the four paths above:
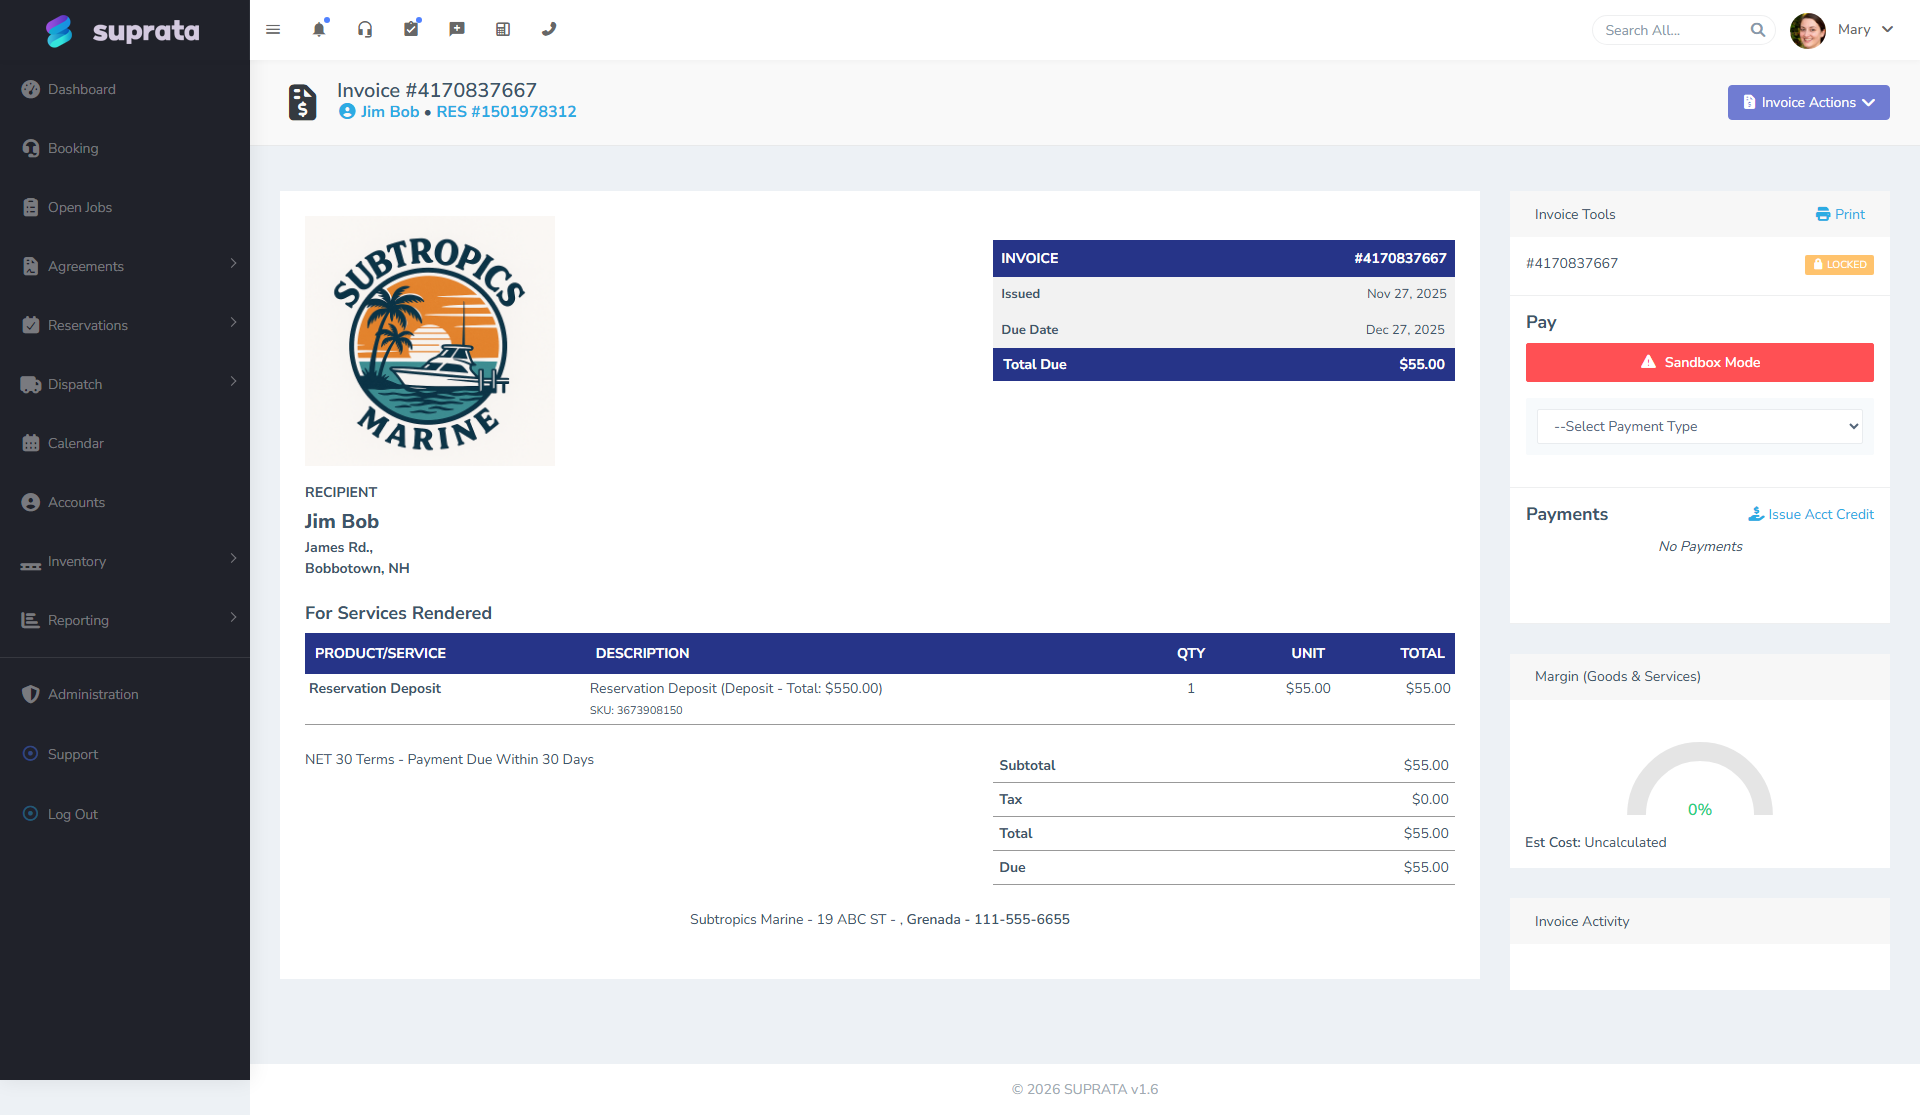
The main areas of the invoice screen:
- Header: the invoice number you give customers, the customer's name, and a link back to the related job or reservation if there is one.
- Invoice block (left): the issued date, the due date, and the total due. The due date is calculated from the terms you assigned (e.g., Net 30 = issued + 30 days).
- Recipient: the customer's billing name and address.
- Line items: each thing the customer is being billed for, with its description, quantity, unit price, and total.
- Subtotal / Tax / Total / Due: the math at the bottom. Tax is broken out per line item based on each item's tax category, then totaled.
- Right sidebar — Invoice Tools: print the invoice, capture a payment, see the payment history on this invoice, issue a credit, glance at margin, and review the activity log for this invoice.
- Top right — Invoice Actions: the menu where you Lock, Close, Void, Edit, Send, or convert to Recurring (see screenshot above).
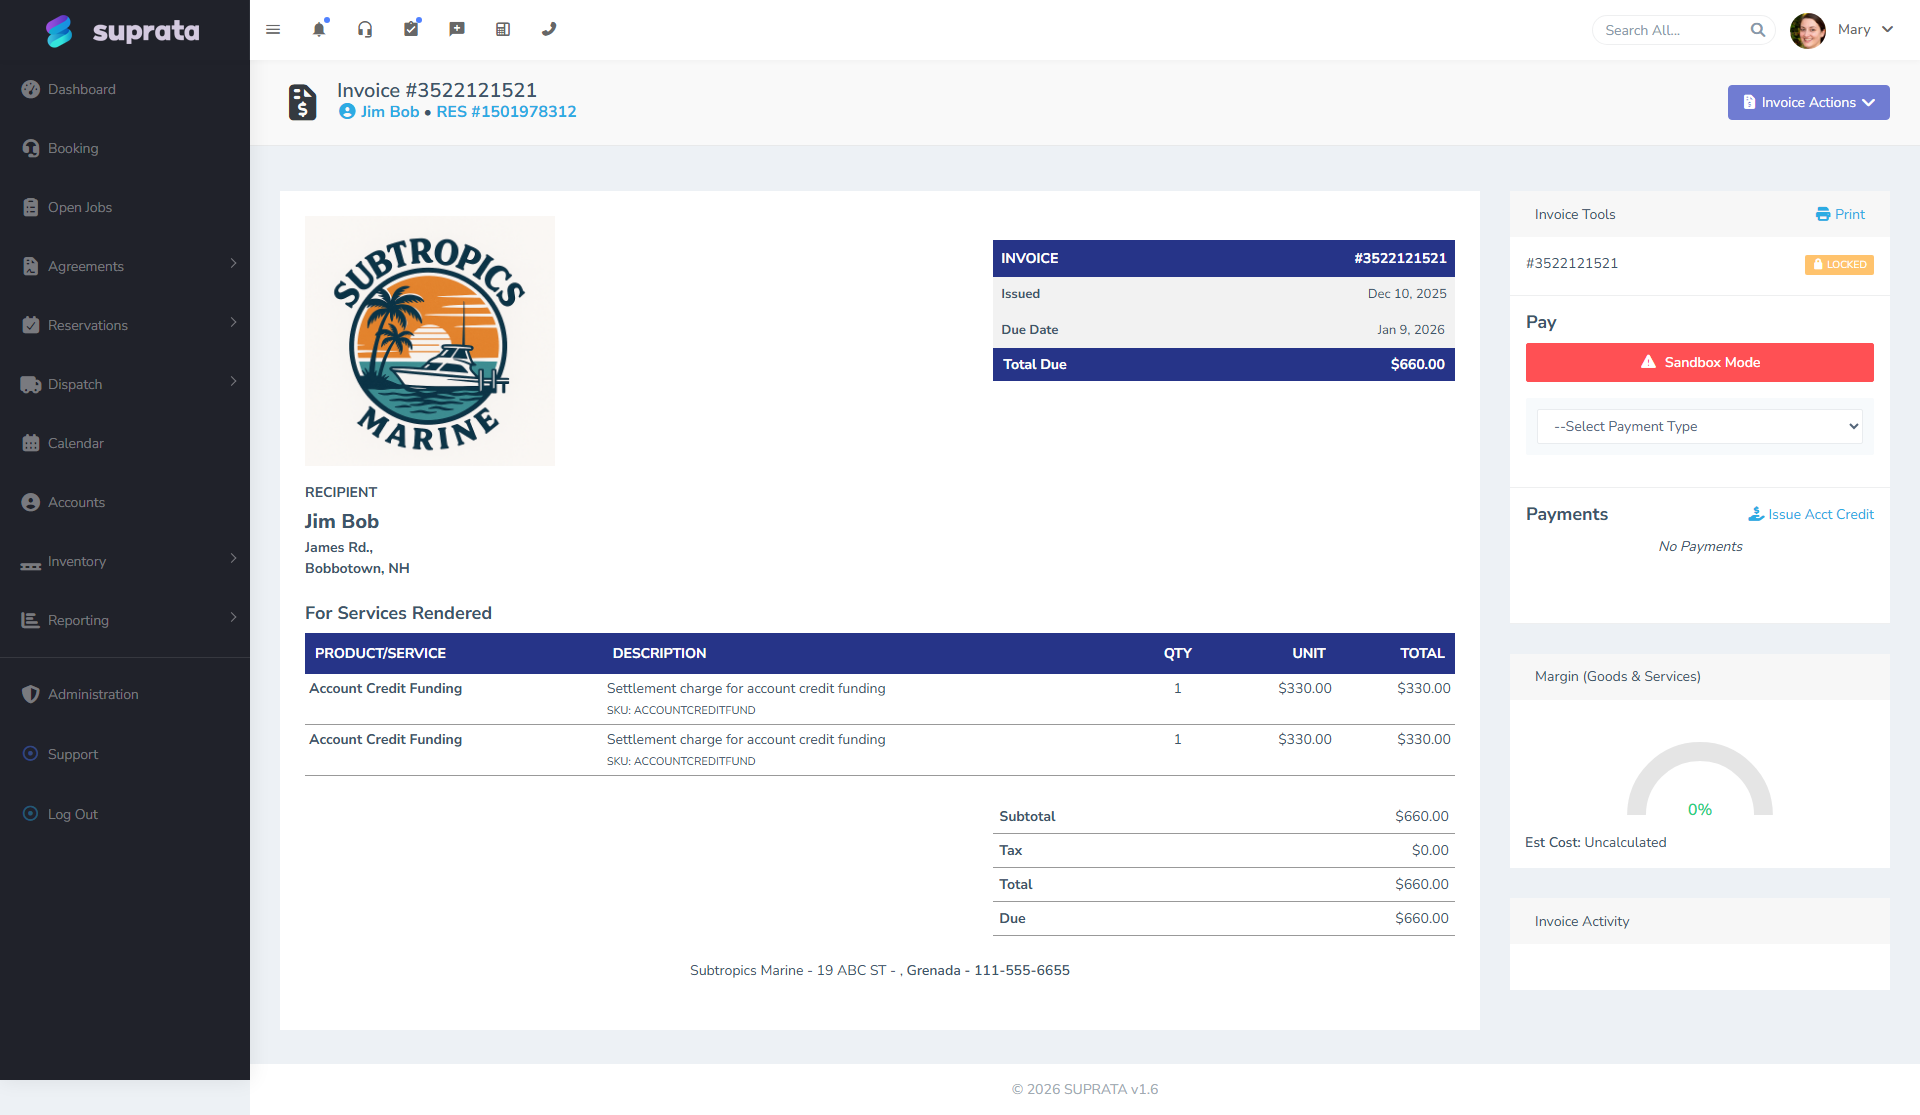
And here's a paid invoice — same layout, different state:
The invoices tab on a customer's Account
To see all invoices for one customer, open their Account dashboard and click the Invoices sub-tab.
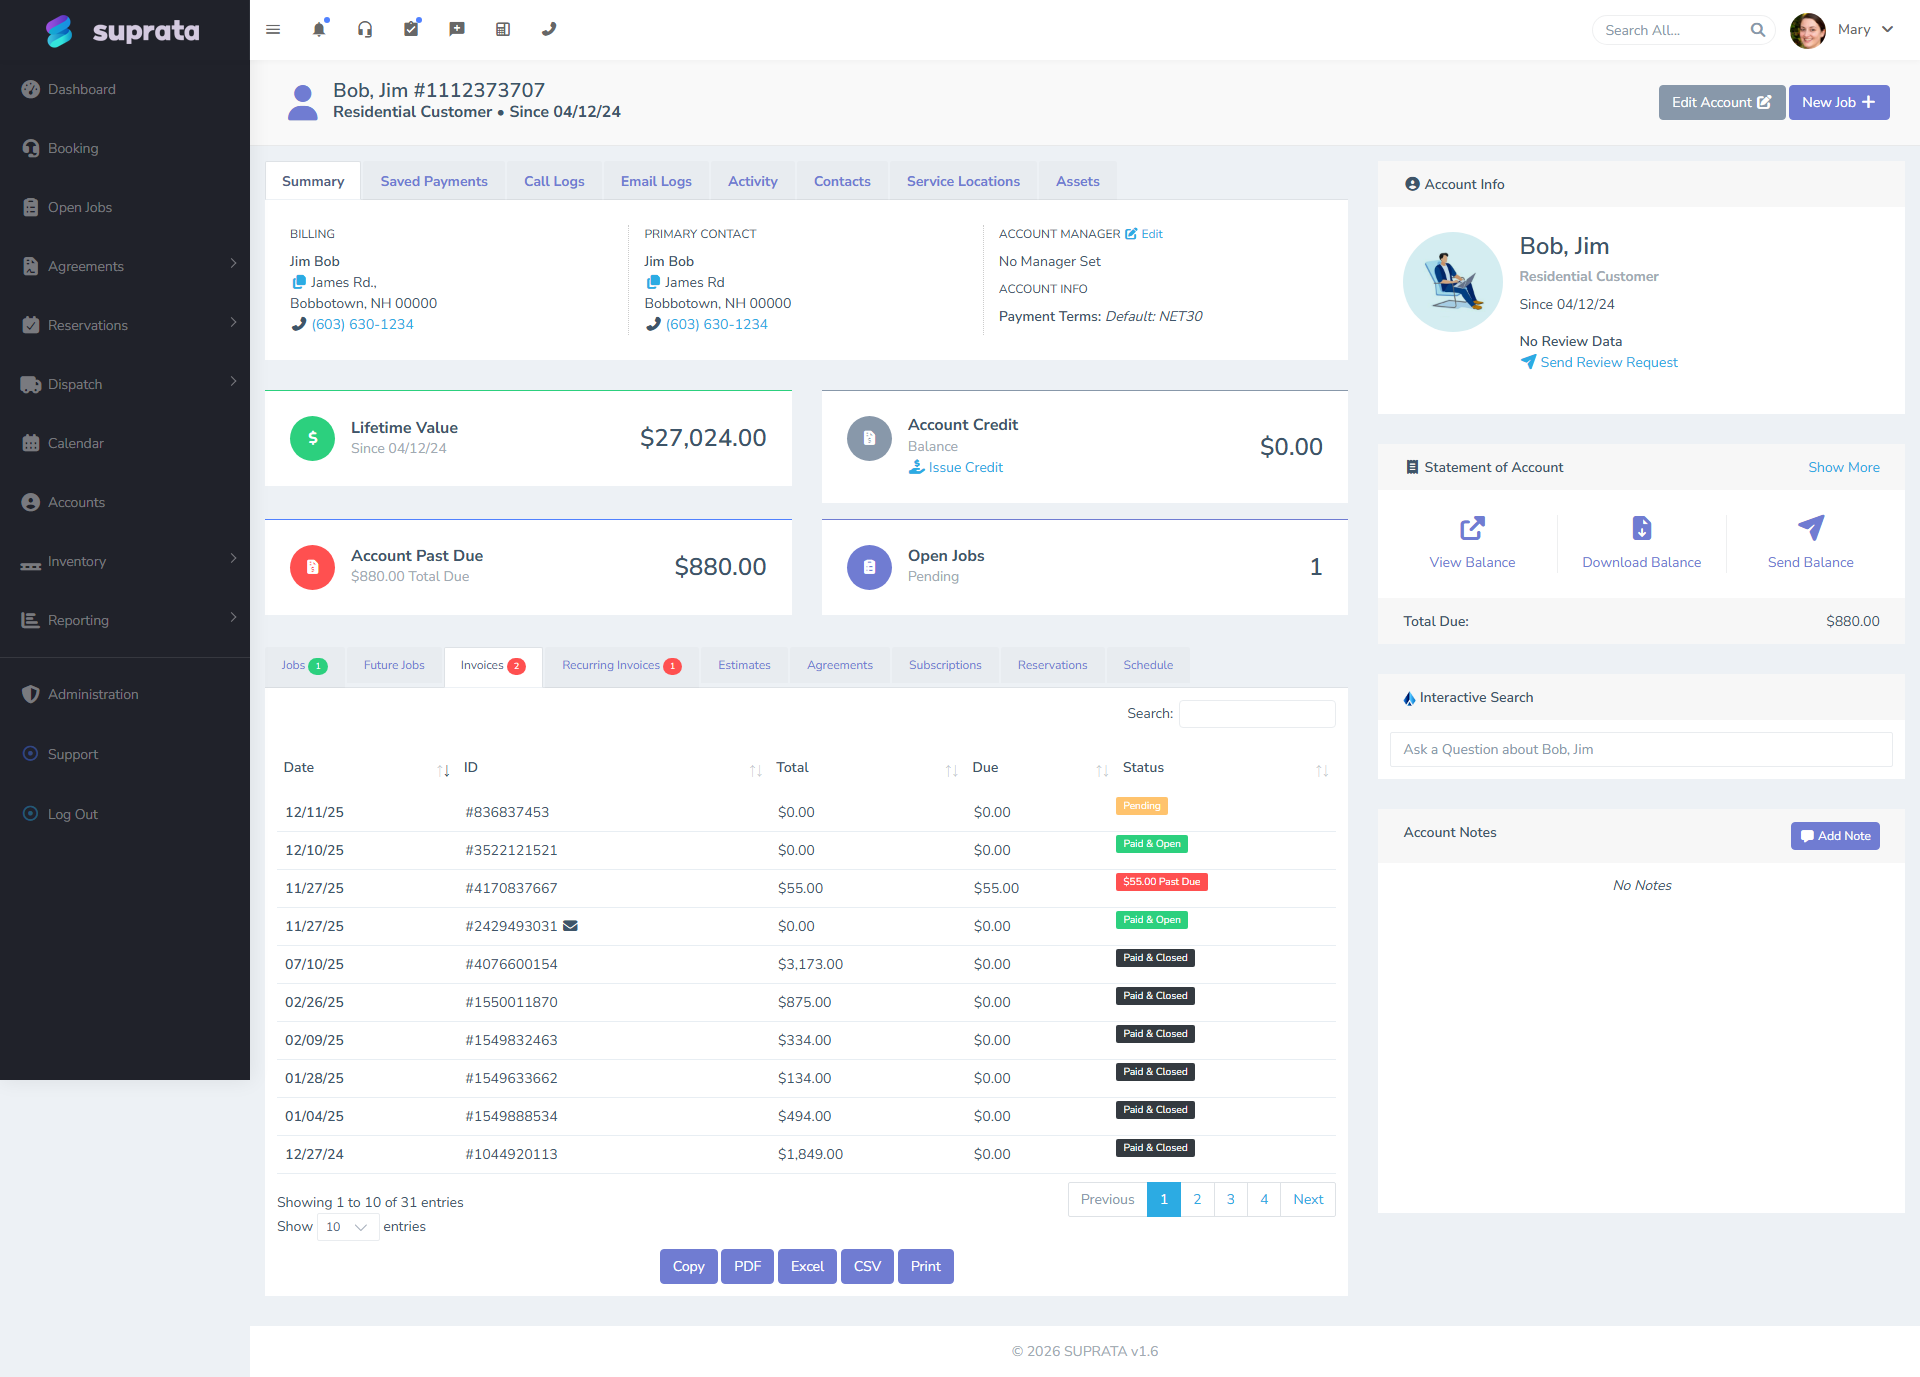
This is also where you'll typically find the invoice the system just created from a completed job, so you can review it before sending.
Next to it is a Payments sub-tab listing every payment that customer has ever made across all their invoices — date, invoice, method, amount, and status. Use the Invoices tab to answer "what do they owe?" and the Payments tab to answer "what have they paid?". See The account dashboard tour.
When you'd skip the "review first" step
The system can be configured to auto-send invoices on job completion (so the customer gets the bill the moment the tech marks "complete"). Most businesses don't enable this — they want a human to glance at the invoice before sending — but for high-volume, very-templated work (a single fixed-price service repeated all day), auto-send is fine.
If you turn it on, set it per job type not globally — service calls might auto-send, but installs probably shouldn't.
Common mistakes
- Reaching for New Invoice when a job would do. It's the fastest button on the page, which is exactly why it gets over-used. If a tech did work, mark the job complete and let the auto-invoice happen — a standalone invoice breaks the audit trail back to the work, and you can't get it back later.
- Leaving a standalone invoice with vague line items. "Misc charge — $340" is a dispute waiting to happen, because there's no job, no photos, and no notes to fall back on. Put the detail in the description while you still remember it.
- Editing an auto-generated invoice instead of fixing the underlying job. If the invoice is wrong because the job had wrong items, fix it on the job — the totals will recalculate. Editing the invoice header to "patch" the issue creates inconsistency between what was billed and what was done.
- Treating "convert estimate to invoice" as optional. Approved estimates that never get converted are revenue you forgot to bill. Convert at job-completion time, not "later".
- Manually creating a new invoice for a customer who already has an open one. Add to the existing invoice instead — combine related charges into one bill rather than creating multiple small ones.
- Forgetting that recurring invoice templates are templates, not invoices. Editing a template changes future cycles, not past invoices already issued. If you want to fix a billed cycle, edit that invoice, not the template.
After the invoice is created
Typical next steps:
- Review the line items, terms, and theme.
- Send it (see Sending an invoice to a customer).
- Track payment via the Account dashboard or the A/R aging report.
- Sync to QuickBooks (automatic if connected — see QuickBooks first sync walkthrough).