How tax categories work in invoicing
Tax categories in Suprata are how the system decides which tax rate to apply to which line on an invoice. Once they're set up, tax computation is automatic — the right rate flows from each item without you having to think about it. This article walks through the mechanics: what each piece does, how they hook together, and how to set them up the first time.
If you haven't yet decided which categories you need, read Picking the right tax category strategy first. This article assumes you've made that decision and now need the click-by-click.
The four pieces that make tax work
Suprata's tax setup has four moving parts:
- Tax Categories (
Financial Settings → Tax Categories) — the kind of thing being taxed. Examples: "Taxable Goods", "Labor (Exempt)", "Reseller Items", "Bottled Water". - Tax Tables (
Financial Settings → Tax Tables) — the actual rates. Examples: "FL 6% + Miami-Dade 1% = 7%", "NYC clothing under $110: 0%". - Pricelist items — every sellable item carries a default tax category.
- Invoice line tax — when an invoice is created, each line picks up the rate(s) for its category automatically.
The mental model: categories describe the kind of thing being sold; tables describe the rate applied; tagging your items correctly is what makes the right tax show up on every invoice.
Where to find each screen
Sidebar: Financial Settings → Tax Categories.
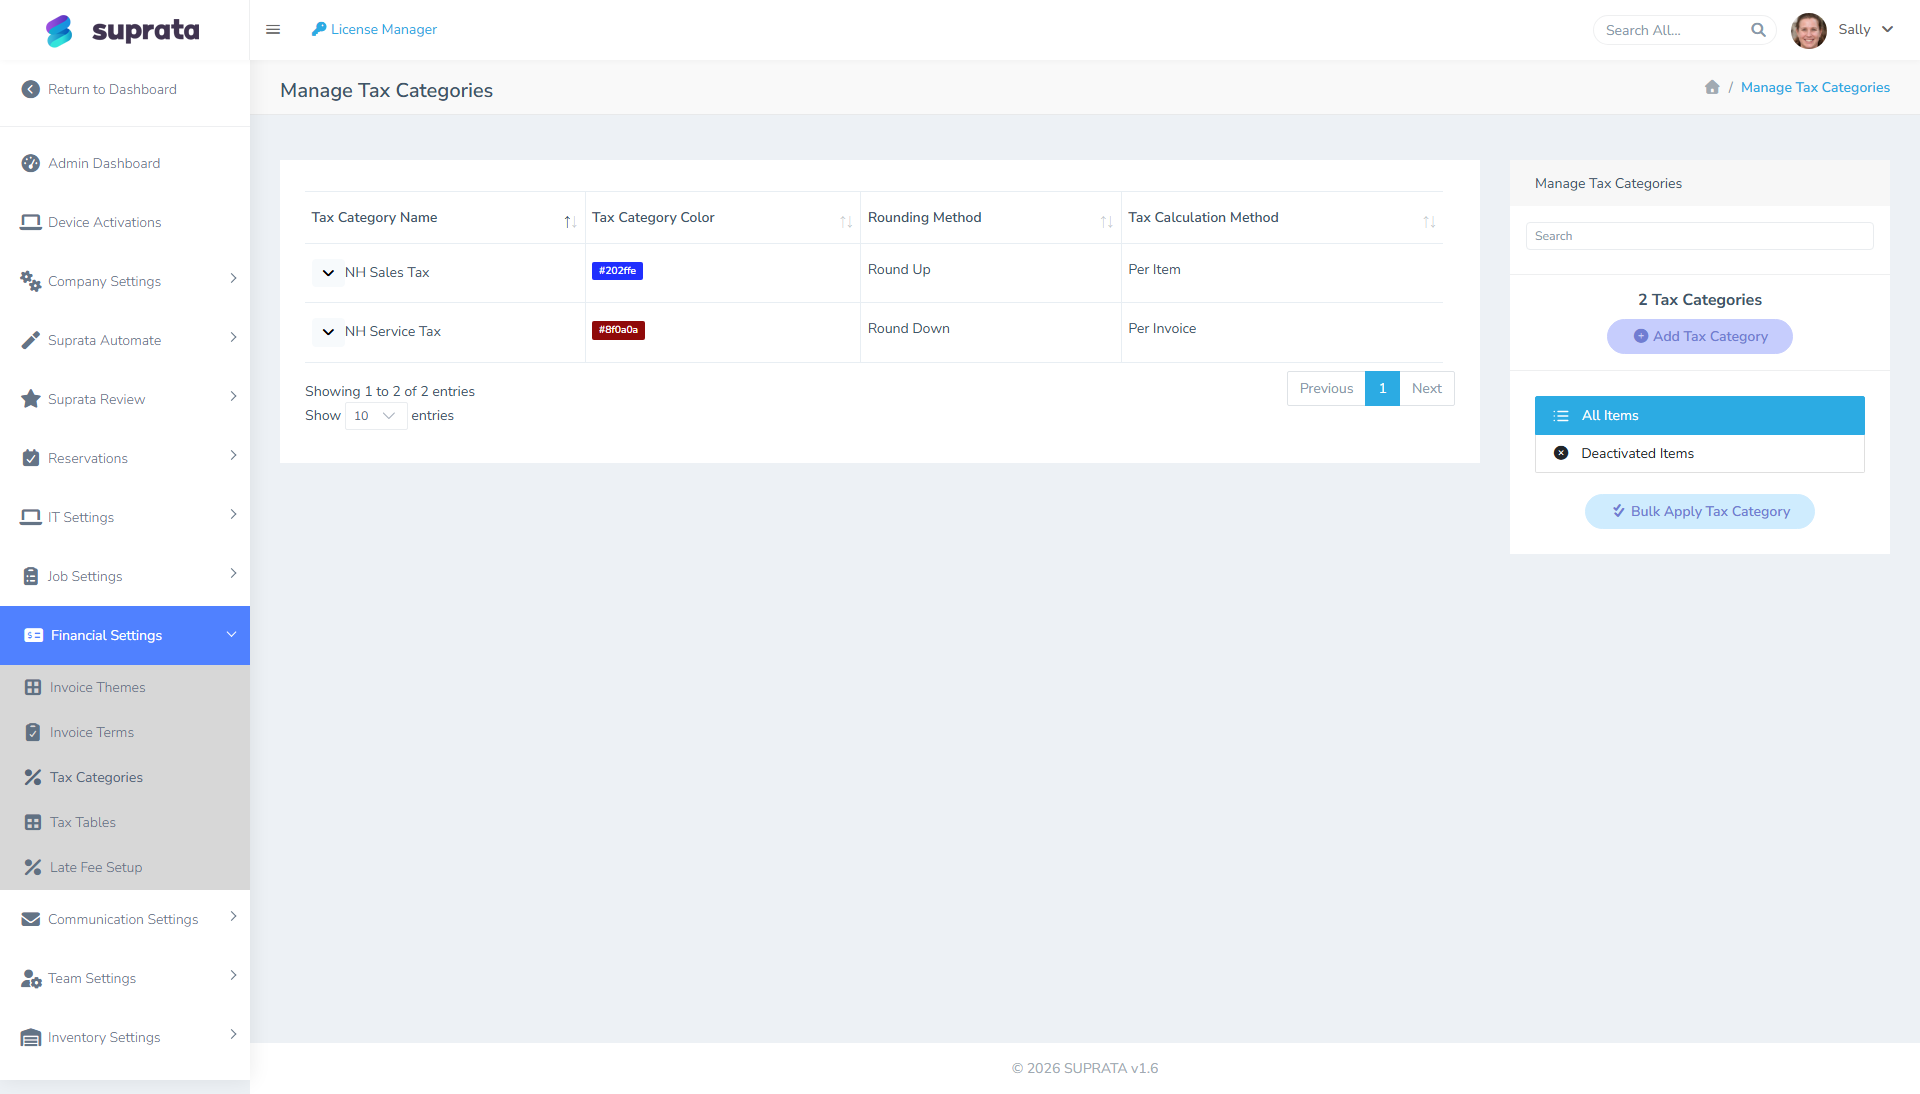
Each category has:
- Name — what you call this category internally and on item dropdowns.
- Color — used as a chip color on items, invoices, and reports for quick visual recognition.
- Rounding Method — how tax is rounded to the cent. Round Up takes any fraction to the next cent. Round Nearest rounds half a cent or more up and less down. Round Down drops the fraction. Round Nearest is ordinary rounding and what most states expect (check yours). Round Up never under-collects; Round Down under-collects over many invoices. Per Item taxes are rounded per unit and then multiplied by the quantity; Per Invoice taxes are rounded once, on the category's total.
- Tax Calculation Method — Per Item or Per Invoice. Per Item works out the tax on each line separately and adds them up; Per Invoice adds up the taxable subtotal first and then applies tax once. Per Invoice is more common and easier to reconcile to your state's expectations. Per Item is the one to use when a price threshold applies to each article: it compares each item's price with the threshold, where Per Invoice compares the invoice's total for that category.
Sidebar: Financial Settings → Tax Tables.
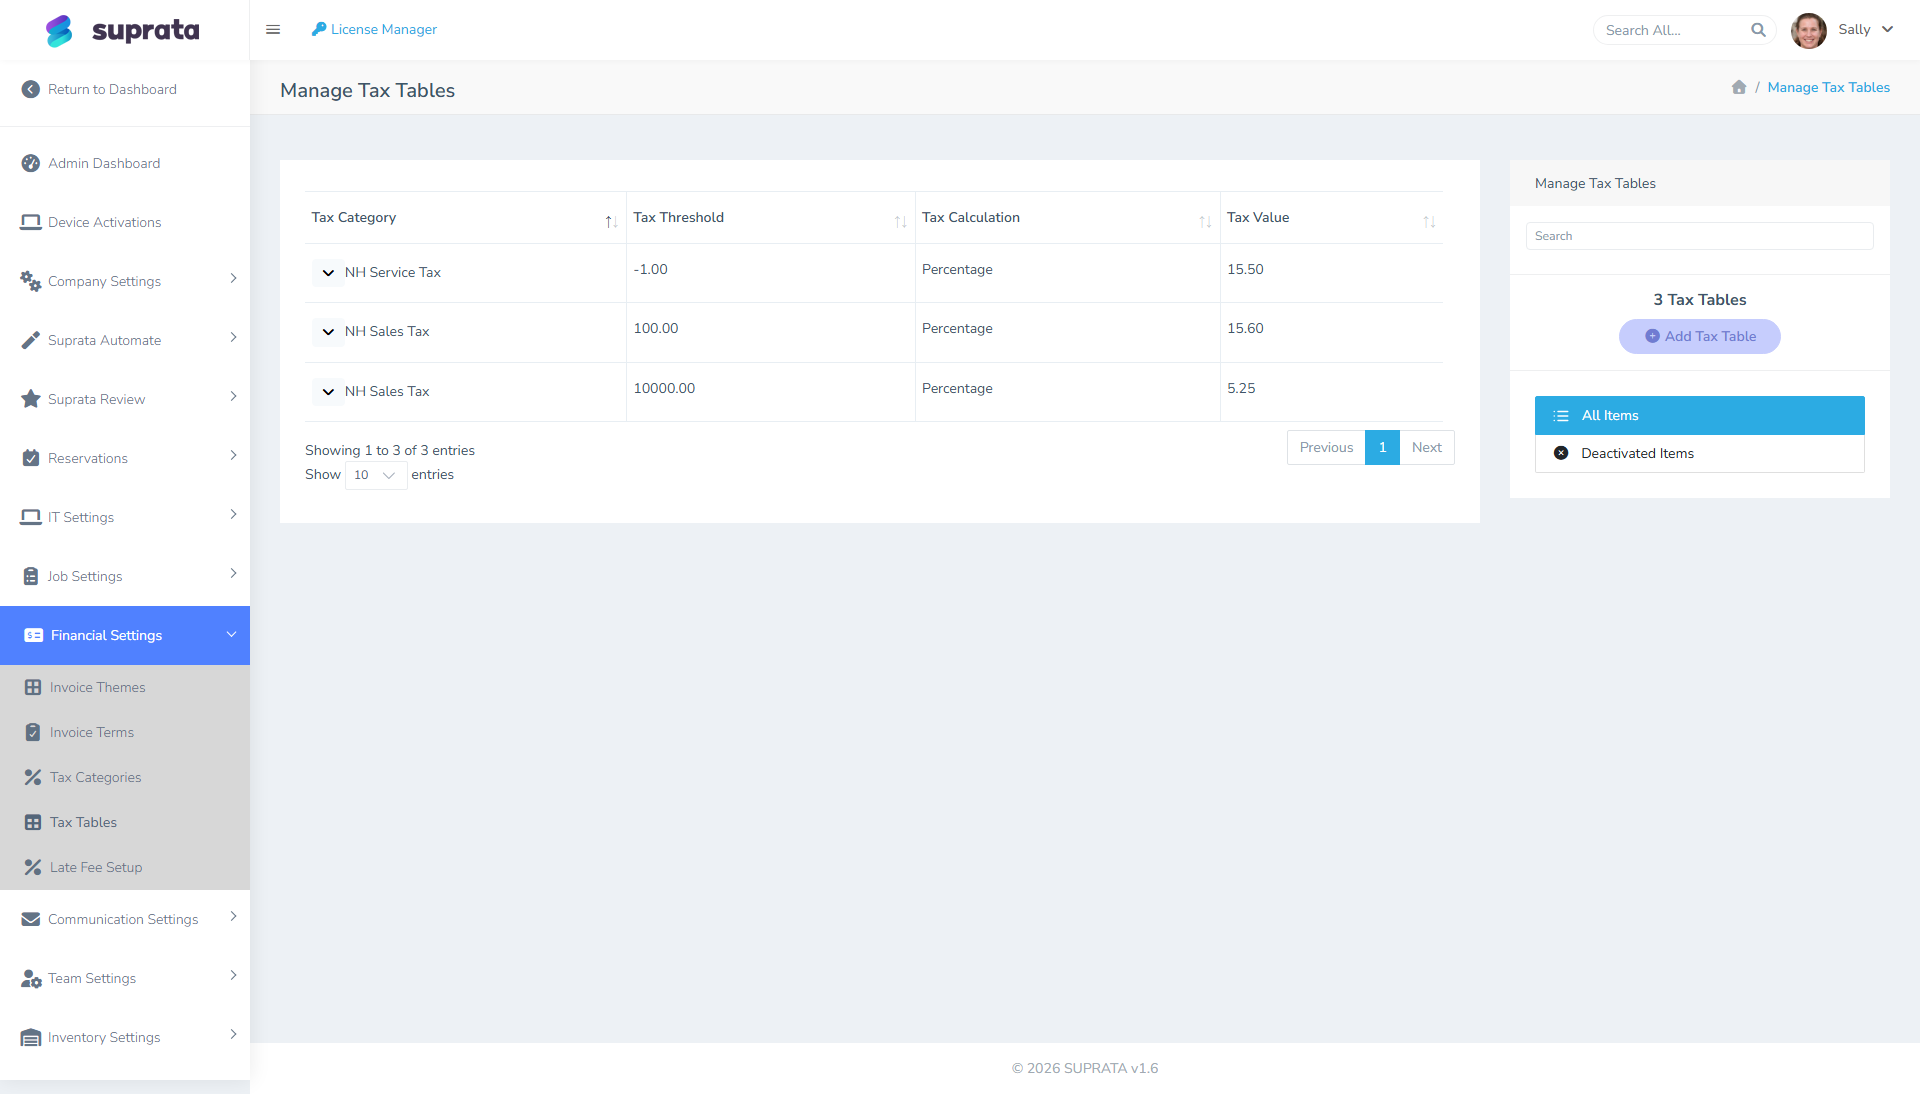
Each row is a rate for one category, optionally limited to items at or under a price:
- Tax Category — which category this rate is for.
- Tax Threshold — which prices the row covers. Use
-1for any price; that's the row almost every category needs, and the screen's help text says the same. Any other number means "items priced at or under this amount":109.99covers items up to $109.99. - Tax Calculation — Percentage or Flat dollar.
- Tax Value — the rate (e.g.,
6.0for 6% if Calculation is Percentage;5.00for $5 flat if Calculation is Flat).
A category can have more than one row, but only one row ever applies to a given price. Rows are price brackets, not layers that add up. See Combined rates and price brackets below.
Setting up your first tax categories — step by step
Take a typical service-business example: you charge sales tax on parts but not on labor.
1. Create the categories
Go to Tax Categories → click Add Tax Category. Create two:
- "Taxable Goods" — color green, rounding "Round Nearest", calculation "Per Invoice".
- "Labor (Exempt)" — color gray, same rounding/calculation. (The settings here don't matter much because no rate will be linked.)
2. Create the tax tables
Go to Tax Tables → click Add Tax Table. Create one row:
- Tax Category: "Taxable Goods"
- Tax Threshold: -1 (any price)
- Tax Calculation: Percentage
- Tax Value: 6.5 (or whatever your state rate is)
Don't use 0 as the threshold. 0 means "items priced $0.00 or less", so a lone 0 row taxes nothing except free items. The category looks set up and charges $0.00 on every real sale. If your account already has a tax like this, the Tax Locations page (under Financial Settings) shows a warning, "… is not adding any tax", with an Apply … to every price button that fixes it. Unlocked invoices that include that tax will show tax the next time they're opened.
Don't create a row for "Labor (Exempt)". The absence of a table for that category is what makes it 0%.
3. Tag your pricelist items
Go to Inventory Settings → Price List (or your pricelist screen).
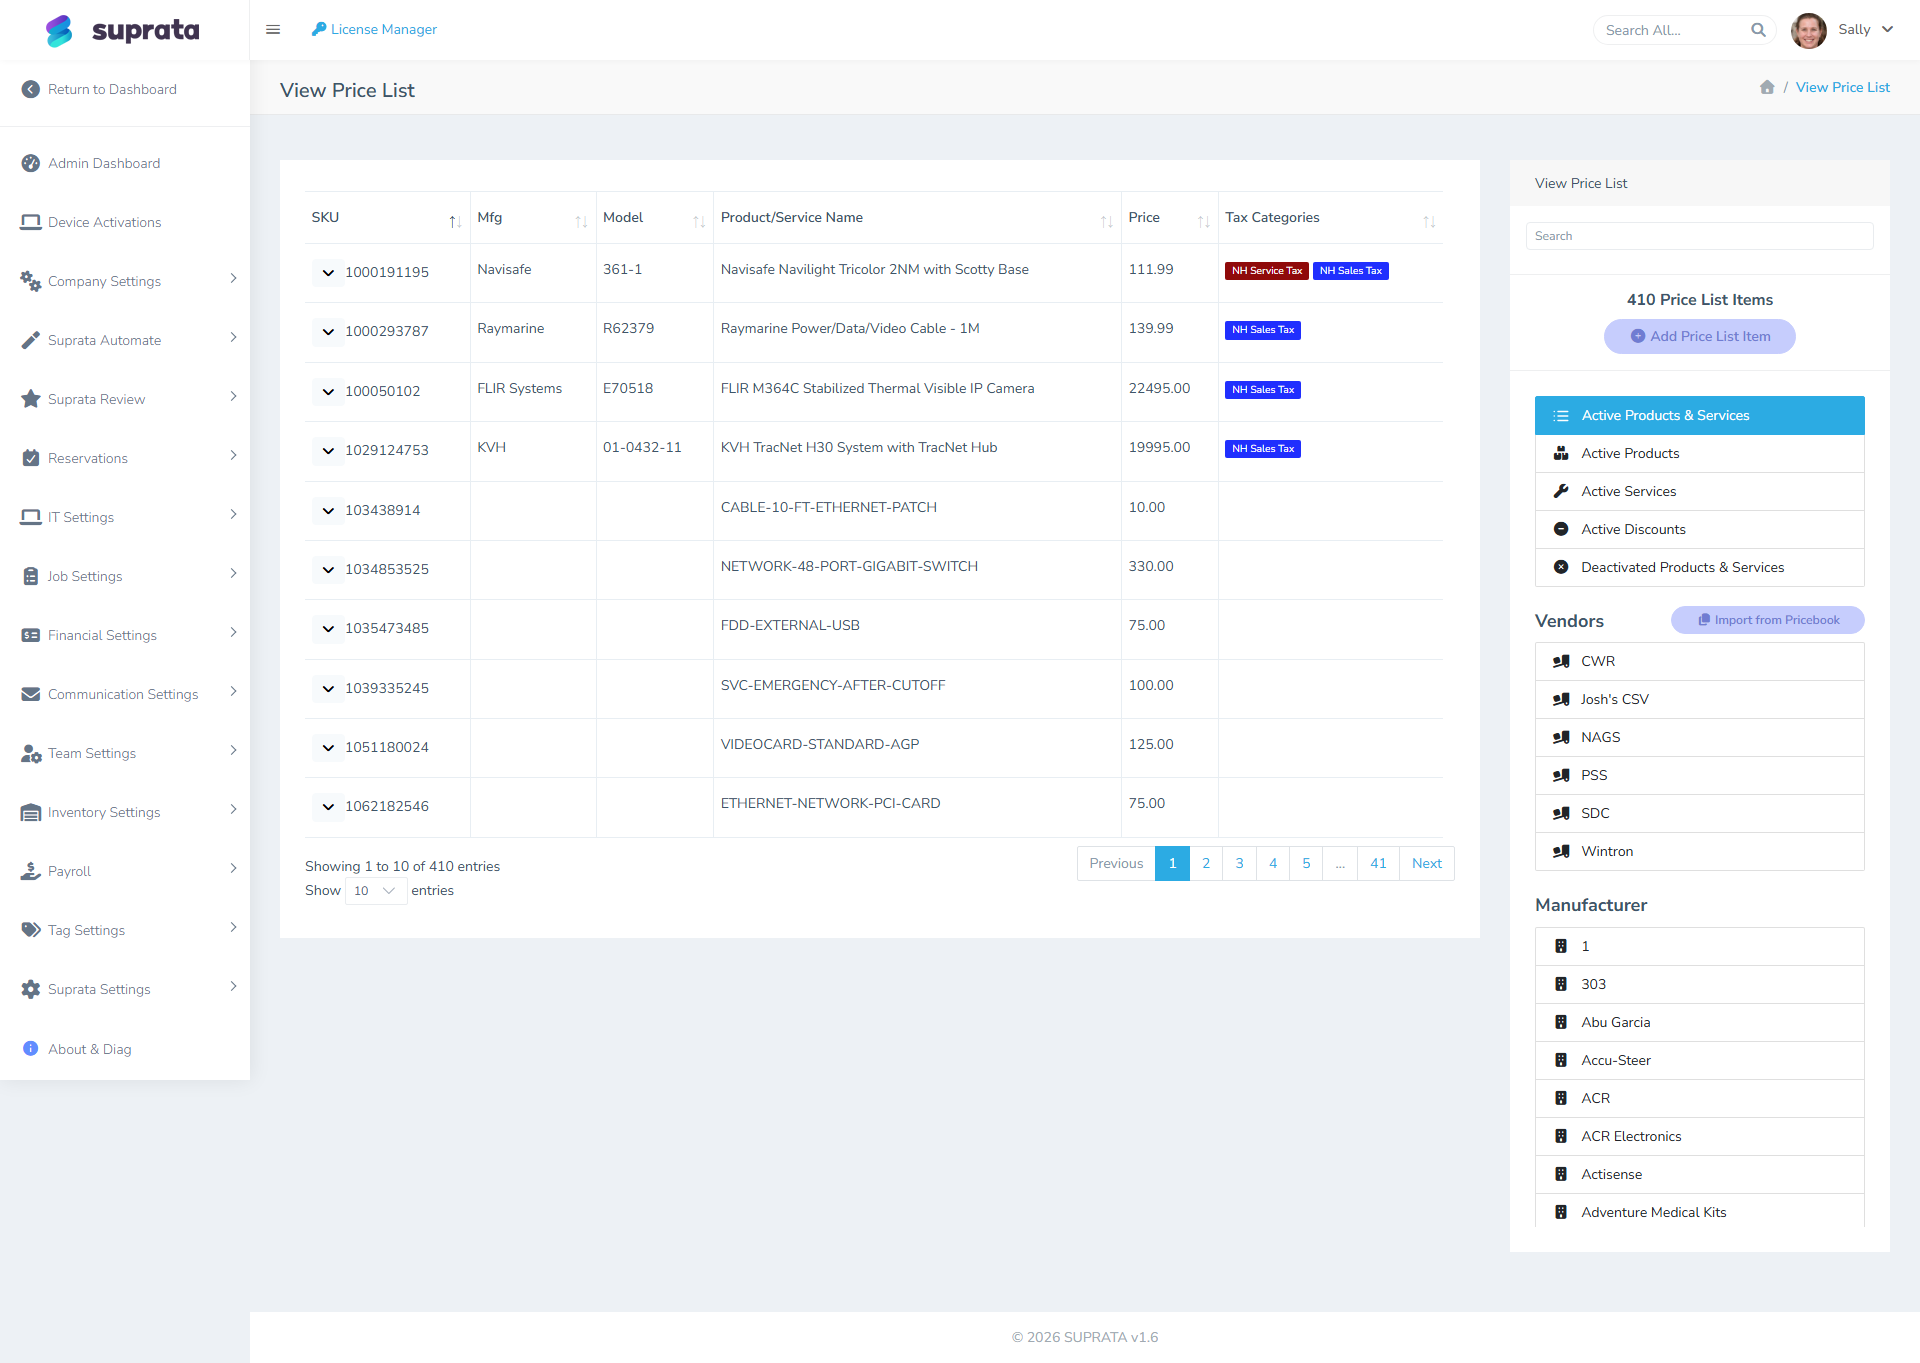
For each item in your catalog:
- Parts, materials, equipment → tax category "Taxable Goods".
- Labor lines, service charges → tax category "Labor (Exempt)".
If you're starting with a long catalog, the Bulk Apply Tax Category tool (top-right of the Tax Categories screen) lets you set the category on many items at once. Use it.
4. Test on one invoice
Create a test invoice with one parts line ($100, tagged "Taxable Goods") and one labor line ($150, tagged "Labor (Exempt)"). Save and look at the totals:
- Subtotal: $250
- Tax: $6.50 (6.5% of $100, the parts line only)
- Total: $256.50
If those numbers come out, your tax setup is correct. If labor is being taxed, you have it tagged as Taxable Goods by mistake. If parts isn't being taxed, the table isn't linked or has zero rate.
Combined rates and price brackets
How Suprata picks a rate for an item, which explains everything else in this section:
- It looks at the item's category and picks exactly one row: the one with the smallest threshold at or above the price.
- If no threshold is that high, it uses the -1 (any price) row.
- If there's neither, that category charges nothing on the item.
The chosen rate applies to the whole price. Two rows on the same category never add together. Two rows with the same category and the same threshold overwrite each other: one wins, and the other is ignored.
Combined state + local rates
Say state 6%, county 1% and a special district 0.5% all apply to the same goods. Three rows on "Taxable Goods" will not give you 7.5%; one of them wins. You have two options:
- One row at the combined rate (recommended): "Taxable Goods", Threshold -1, Percentage 7.5. Put the breakdown in the row's description ("State 6 + County 1 + District 0.5") so you know what to change when one part moves.
- One category per authority: "State Sales" (-1, 6%), "County Surtax" (-1, 1%) and "District Tax" (-1, 0.5%), with each taxable item given all three categories. An item can carry more than one tax category, and each category is charged separately, so these do add up: a $100 line shows $6.00, $1.00 and $0.50. Choose this only if your return asks for each authority's amount separately. The cost is that every taxable item needs every category, and a new item missing one is under-taxed.
Price brackets
A threshold row is for when a different single rate applies to cheaper items. New York City, for example, exempts clothing and footwear priced under $110 per item:
- "Clothing & Footwear", Threshold 109.99, Percentage 0 (items up to $109.99)
- "Clothing & Footwear", Threshold -1, Percentage 8.875 (everything else)
A $60 shirt pays nothing; a $150 coat pays 8.875% of the full $150. Set a category like this to Per Item, so each article is checked on its own price. Always include the -1 row, because an item priced above your highest threshold with no -1 row is charged nothing.
"Base rate plus an extra rate on the part above $X" (Tennessee's single article tax, for example) can't be built with one category, because a bracket's rate applies to the whole price. Use the -1 row for the normal rate, and check with your accountant how to handle the few sales that the extra tier affects. For the full walkthrough, see Setting up tax tables in detail.
Per-customer overrides
Sometimes you need a customer-specific rate — most often for tax-exempt customers (resellers, government, nonprofits with valid exemptions).
Set the customer's Default Tax Category on their Account to a category that's linked to no tax table (an "Exempt" category). Now every invoice for that customer defaults all lines to "Exempt", computing 0% tax regardless of what the items would normally be taxed at.
For one-off exemptions, override the category right on the specific invoice line at invoice time.
Tax-table changes and existing invoices
When you change a tax rate (your state raises sales tax from 6% to 6.5%, say), update the existing row — don't create a new one and leave the old one floating.
What happens to invoices already in the system depends on their state:
- Unlocked invoices recalculate their tax with the current rates the next time they're opened or changed. An unlocked invoice from last month, opened after the change, shows 6.5%.
- Locked invoices keep the tax they were locked with, and their total stays consistent with it.
- Closed and voided invoices never change.
So lock invoices whose tax must not move before you change a rate, such as invoices you've sent or that have been paid. Lock is in the Invoice Actions menu. And change the rate on the day it takes effect, not earlier, or every unlocked invoice opened in between picks up the new rate early.
Common mistakes
- Setting up tax tables but skipping categories. With no categories, there's nothing for the tables to attach to and no way for items to know which rate applies.
- Naming categories after rates. "7% Tax" becomes meaningless when the rate changes. Name them by type: "Taxable Goods", "Labor", "Exempt".
- Using
0as the "everything" threshold.0covers only items priced $0.00 or less, so the tax never charges anything. Use-1for any price. - Expecting several rows on one category to add up. Only one row applies per price. Enter the combined rate as one row, or use a separate category per authority.
- Forgetting that exempt items need an explicit category. A blank category isn't the same as a "no tax" category. Create a real "Exempt" category and tag exempt items with it.
- Mixing Per-Item and Per-Invoice across categories. Most accountants want consistency — pick one and apply it across categories unless you have a specific reason to mix.
- Not testing after setup. Always run one practice invoice through after configuring tax. The math errors that surface in the first 30 seconds are easy to fix; the ones that surface six months later are not.
- Trying to model destination-based tax with categories. Categories don't know about geography. If your tax varies by where the work is done, for example a New Hampshire shop doing a mobile job in Massachusetts, use tax locations instead. They let an invoice charge the tax of the job site or the shop automatically, on top of the categories you already have. See Charging tax where the work is done.
What this article does NOT cover
- Multi-state nexus. Whether you're required to charge tax in another state is a tax-professional question, not a software question. Suprata charges what you tell it to.
- Charging another state's (or city's) tax for work done there. That's tax locations, covered in Charging tax where the work is done.
- Exemption certificate management. Currently a manual process — store the customer's certificate outside the system and override their default tax category accordingly.
- Sales tax remittance. Suprata produces tax reports (under Reporting → Tax Reports) that show what you collected; filing and paying is a separate process.